The guitar body I ordered is an unfinished body, meaning it hasn't been painted yet. The body I'll receive will just look like a piece of wood cut into the shape of a guitar, which leaves the job of painting entirely up to me. I could paint other parts of the guitar, such as the fretboard, but that would entail removing the frets in order to get to the wood for proper painting. Since this is my first project, I'll avoid the extra work and save it for a future project; sort of like why I'm not crafting the wood myself.
Luckily, painting a guitar is pretty much the same as any piece of wood and plenty of help exists online to guide newbies like myself on how one goes about doing that. What it comes down to, is 3 (3.5?) basic steps:
- Prime the wood - The first step is to apply a chemical known as a 'Primer.' It is a vital step in the painting process because it prepares a porous material, like wood, to be more adhesive to the paint that is applied. As a side effect of the increased adhesion, the paint becomes more durable: it becomes less likely that it will crack or flake off. It also makes the wood more water resistant, though for a guitar, that isn't really that important.
- Paint the guitar - Now is the part that everyone expects: you paint it. At this step, you apply whatever color you want to the guitar. This part is entirely up to the person who is making the guitar. Not much more to really to say here...
- But actually there is. This is also the step when you apply your own designs (after applying the base color of course). At this point, you paint on whatever designs you want, whether it be skulls, flowers, ponies, guns, cartoon characters, or even a combination of all of those if you so choose.
- Apply the Lacquer - The lacquer is the glossy sheen that all guitars have and a similar variant of it is what gives cars their lustrous paint job. If you don't apply the lacquer, you'll wind up with a very matte finish, similar to what your painted walls look like. Great for home, not great for the stage.
 |
| Oh my. Which one to choose? |
Simple enough, right? Nope. The question that immediately needs answering now is "How do we apply these paints? During my research, I came upon three options: a brush, spray cans, and spray guns. Everybody who's been in kindergarten knows a paint brush. Unfortunately, their use really only applies to step 2.1, since the precision is great, but painting an entire guitar with a brush would result in an uneven, unprofessional appearance. Nope, have to try something else.
Spray Cans are another option, which is a popular choice. Unfortunately, for my purposes, I am avoiding spray-cans. I want to do this project right, and a spray-can does not apply an even enough coating. The chance of dripping is too much for me.
So then naturally, my last option and choice is the spray-gun. I chose this on a recommendation from my local DIY encyclopedia. He said that if I wanted to do it right, a cheap (relatively...) spray-gun would be the best way to get a smooth application of the paint. After juggling the cost of buying an expensive tool (they start at $100!) versus how badly I wanted my guitar to look good, I decided to go for the spray-gun.
 |
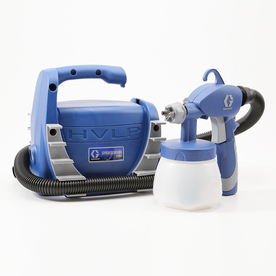
| The Graco 2900. The 2900 means it's better than 2899 other spray-guns |
The one I decided on was this one pictured to the left, image courtesy of Lowe's. I chose it basically because of how highly reviewed it was on most sites, and because of how relatively inexpensive it was. Additionally, the reviewers took special note to say that it was ideal for small home projects that don't require a lot of paint, perfect for a budding guitar painter.
So that's it for this post. I had to get this implementation stuff out of the way; I figured it would be more important to explain what I was doing before I started chronicling the various steps I took along the way. From now on, posts will likely be shorter in length and will be more focused on my attempts at building a guitar. It's exciting for me, and I'm happy to share it with you all!
Thanks for reading!
No comments:
Post a Comment